Saturday, July 30, 2011

The Triton Bottom Paint Death March, Part II

Ten days of pain(t), and no one has died.  Yet.


The saga continues, and like POWs in the war on copper paint, we trudge along on our own private death march. . . 

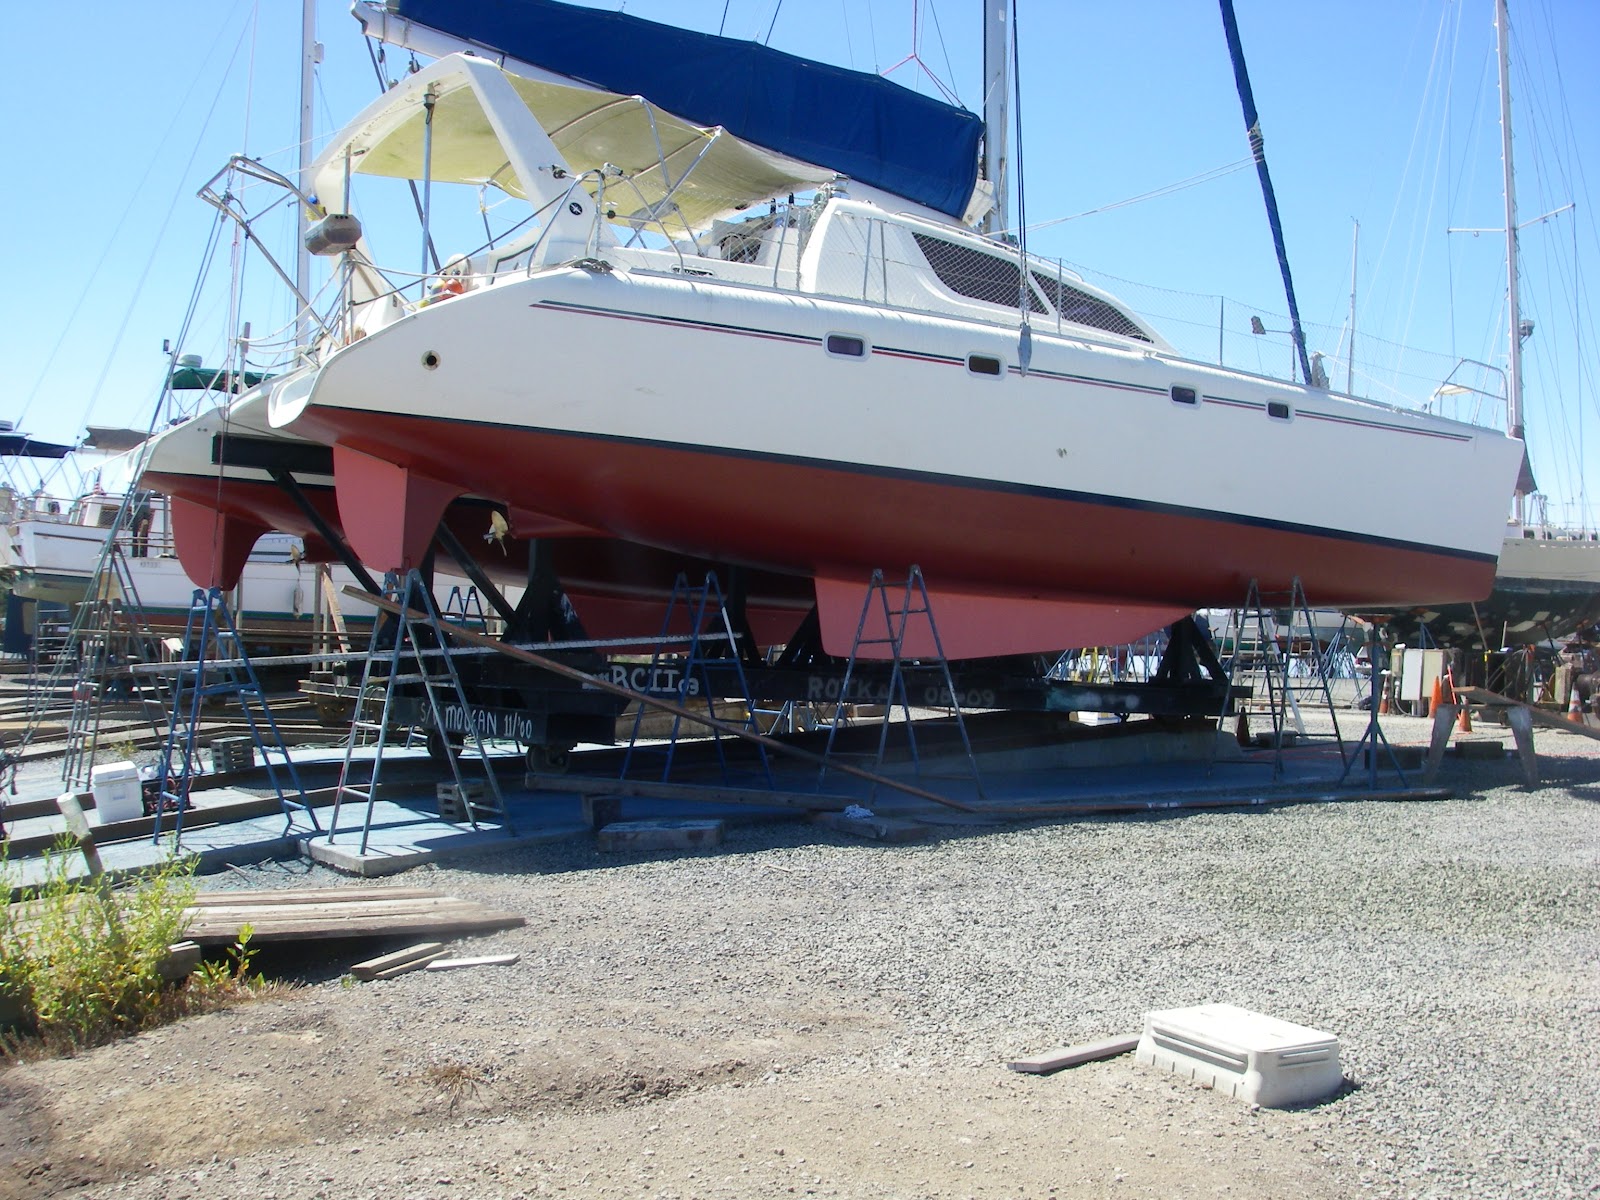
Triton's nearly sanded bottom.  Almost all of the old blue paint has been
removed, and carefully reapplied to our hair, our clothes, the pores of
our skin, and any previously clean, horizontal surfaces on the boat. 
There is an old saying that "when you are up to your ass in alligators, it is easy to forget that your original intention was to drain the swamp".   There is an analogous maritime saying, older even than the one about the alligators, almost as old as boats themselves, that goes "Maybe we should pay someone to do this job?"

I believe this saying was invented approximately two years after the first bottom paint was ever applied to a vessel, and was first uttered exactly seven hours and forty-five minutes into the first day of the bottom job, when the boatwright suddenly realized he was going to have to keep doing this again tomorrow, and the next day, and the next day, and quite possibly the day after, and maybe even longer than that.

AnnMarie wearing her "sailor's burka"
We've got the boat down to mostly bare gelcoat, cleaned up the fiberglass and put on the epoxy barrier coat, but this was no mean feat!  Taking the paint off of a boat this size is a daunting job, especially the areas around the rudder and propeller shafts, and any other areas that have sharp, concave surfaces or tight corners, seams or or edges.   We've run out of the chemical stripper, which we had been using to great effect, but was expensive.  If we had to do it all over again, we would have bought three times as much, and used a pressure washer to boot!
[editor's note: It goes without saying that if you take a job like this on, make sure you have an adequate supply of chemical stripper on hand before you start.  But the real important object lesson here is that if you do happen to run out, DO NOT hand a few hundred dollars in cash to your friend and ask him to "just pop out and bring back some stripper".  Be very clear that you want C-H-E-M-I-C-A-L stripper.  The other kind will not remove any paint, no matter how much additional money you offer her.]


The green gunk is the chemical stripper at work.  Definitely made our
job much easier, and if we had more of it, we would have used it.  We
couldn't get the other stripper to do anything except pout.

 Don't get us wrong, the chemical stripper wasn't a picnic either.  It required scraping the layers of paint off, without gouging the gelcoat.  That isn't nearly as easy as it sounds, and working overhead is a difficult, unpleasant job under the best of circumstances, like when you are being paid hourly, but it is not ever fun.  When we ran out of chemical stripper, life went from bleak to black, or at least dark blue and dusty.  We are now back to using, as they've come to be known by us, "those fucking grinders"*.

[editor's note: "those fucking grinders" is a registered trademark of SatansMaritimeHell.com, and is used with permission.  Their motto "Tempting human souls is hard work; take the easy way out with those fucking grinders!  Guaranteed to wreak havoc on the most saintly of souls.  Over 1 million evil acts committed."]

We were originally (back before the tingling and numbness set in) calling them "Sea Flowbies" or "R2D2's Retarded Cousin", both of which sounded cute but didn't really convey the sense of dread we eventually developed towards them.  Sort of like referring to a case of Bubonic plague as "A pocket full of posies".   These really are god-awful machines.  They are a silly solution to environmental concerns (especially frustrating because it seems the newer paints are significantly less toxic and wouldn't require such stringent regulations), and as grinders go, they are about as effective as the rhythm method.  In fact, if the Pope ever had to grind the Pope Mobile back down to the Kevlar gelcoat, especially if he had to do it wearing a respirator over his zucchetoo, he probably would have been far more understanding about cursing, losing faith in God, and taking the pill.
Please, God, make it stop.

The hull approaching whiteness.
Where was I?   Oh, yeah, those fucking grinders.  We really do hate them.  We hate everything about them.  But mostly, we hate the sandpaper disks that don't stick to the Velcro backing pads and we hate the way said disks fly off just when you start to make any progress.   We now have a stack, six inches tall, of used sanding disks.  Well, actually, it would be six inches tall if you went around the boat picking them all up off the ground and stacking them neatly on top of each other.   What we have now is more like an area-rug's worth.  We have also blown through a few more tubes of the non-Velcro backed adhesive, which is the only solution we've come up with that will keep the sanding disks on the grinder backing pads.

The adhesive is basically the crystal meth of grinding.  Once you start using it, you can't stop.  This isn't normal, BTW.  You aren't supposed to ever use this adhesive on a Velcro backed grinding pad.  You only ever put this stuff on when the grinder backing pad's little Velcro hooks have completely failed.  Which seems to happen about twenty nanoseconds after you start using them.

At some point during the week, one  of the grinder pads physically broke off, and the good folks at Napa Valley had to replace the head.  The brand new backing pad worked for about two days, then disks started flying off of it.  Did I mention that I hate those fucking grinders?

Tiny pock marks, probably
from the original mold.
Onward we ground.  We needed to get most all of the paint off, so that we could apply a couple of coats of epoxy barrier coat.   "Why?", you ask.  Well, because it is supposed to make the boat that much more impervious to boat blisters.   The claim is that blisters form for a number of reasons, but a key one is the desire of moisture to migrate through the fiberglass.  Create a completely moisture-proof barrier, so the argument goes, and you reduce the likelihood that you'll get blisters.

I think that this may be the moral equivalent of those little plastic protector tabs for the heels of your shoes; the ones they used to try to sell you in the '80s, but instead of putting them on your shoes, this is more like having them stapled directly to your feet.
Applying penetrating epoxy.
But still we grind on.  We grind until we can only see the whites of their eyes.  Or, to be more precise, the whites of the gelcoat.  That means making sure everything is pretty much white, and that any gouges caused from those fucking grinders, or any blemishes, dents, or other pock marks, must be filled in with epoxy and faired.    Much to our surprise, the hull wasn't in bad shape at all, although we did find a few spots where there were very tiny pockets, but our hero Kelly (the fiberglass repair expert at Napa Valley Marina) assures us that this was probably a minor defect created when they sprayed the mold during construction.   We've gone through and painted all of these areas with Smith's penetrating epoxy, which is a very watery two part epoxy that gets into cracks and crevices and creates a better surface for the epoxy filler to bond.  Then, we filled in any holes or divots we found with an epoxy putty, and ground the hull back fair again.

Before fairing back the epoxy.

We got extremely lucky with our weather window. It was stifling hot the week before we arrived, and it rained the entire week after we finished, which was lucky for us, it also made working a bit easier.   If you are going to try to do something like this, it is best if you can arrange for it to happen when the weather is warm, dry and still.   If you figure out how to arrange the weather, please let me know.
One interesting discovery we made while doing this is that the leading edges of both hulls were covered in a reddish-brown type of bondo.  At first I thought that perhaps this indicated some sort of earlier grounding and repair job, but Kelly seemed to think that this is typical of how these boats are constructed.  We also found the same bondo technique around the area where the drive shaft log attached, as well as around the rudder base, which is pretty much every connecting seam of the hull, on both sides of the boat.  I'm not sure what to make of it, if you have any similar experience or insight, please drop me a line.

The hull just before we painted the barrier coat.
Once we completely finished sanding the hull (including patching the no longer used thru-hulls), and had everything nice and smooth, we needed to wipe all the surfaces down in acetone, to remove the dust that was statically clinging to the hull surfaces.  This is one of those steps that doesn't seem like it should make that big a difference, but it does.  No matter how good a job you do at cleaning up the hull (we had wiped it down once already), the acetone will still pick up more gunk and dust, so be prepared to go through a lot of clean white linen rags.   The advice we got was to use it liberally, while wearing gloves and a respirator, and make sure you don't miss any spots.   Expect to go through about 2 gallons of acetone as well on this project.

Our hero, John, was instrumental in making this
project possible.  Without his and JD's efforts, we
 don't think we could have survived, much less
finished the death march.  We'd probably still be
working on it.
What frustrated us most about this whole ordeal was how long it took to get the old paint removed, and conversely, how quickly the new paint went on.   The epoxy barrier coat had to be mixed together and thoroughly stirred, then allowed to sit for an hour or so before we could apply it.   If you do this yourself, make sure you read all the directions on the can before beginning, as there are some pretty non-intuitive steps, with some very badly translated phrases from the original Middle English.

Once mixed together, you'll have a couple of hours before it completely hardens, so work quickly but don't rush.   The paint comes in at least two shades of grey; we used three gallons of each color.  If you are putting two coats on, you'll want the under coat to be a lighter color than the top coat, otherwise you'll forget where you've painted already.   We're pretty sure there are some spots that four or five coats because we just couldn't remember, or were told "Oh, I just painted that area" by someone else.   You probably won't get everything done in just one go and knowing where you were when putting on the second coat is crucial.

Our other hero, JD was a rock star!! An Amazon of a woman
 who worked hard and did yeoman-like work to boot!
You'll also want to have a reasonable schedule as to when you apply it.  The first barrier coat needs at least 12 hours to cure, so plan on putting it on in the early afternoon and allowing it to dry completely, overnight.  Put the next coat on the following morning (providing it is warm and dry out) and then apply the bottom paint later that evening.  You should be able to then slap on at least one or two more layers of bottom paint before you need to put the boat back in the water.

The bows in preparation for the the blue stripes.
We did something a bit more creative.  In all my readings, one theme I've come across often is that when catamarans get into trouble, they sometimes will flip upside down and become quite stable and difficult to sink.   This has been the case with numerous high profile disasters lately, and being that it can be difficult to spot a dark blue hull floating in the ocean, a number of catamaran owners have taken to painting their hulls in bright colors.  In fact, our friends, Laureen & Jason decided to paint their catamaran's entire hull Emergency Orange, although I'm not sure if that was their reasoning.  Nonetheless, it gave me the idea that we could paint the keel and rudder orange, in case we were ever floating upside down in the ocean and the Coast Guard was having trouble spotting us.    This kind of reasoning is why AnnMarie forbids me from picking out my own clothes.

This was our first attempt at painting the keels orange.  The
white is the caulking we used between the keel & hull.
So we started hunting around looking for orange bottom paint.  Napa Valley has a "corkage" fee that they charge on any paint you use if you don't buy it through them.  While I personally find this a bit unfair, it is their business, and they deserve to make the markup instead of West Marine.  Okay, so we ordered the paint through them, but we made one fatal mistake.  We asked Kirby how much paint he thought we'd need.  His answer was, like many other things we'd asked him, wrong.  Completely wrong.  And like most everything else he was involved in (see Napa Valley Marina), it would also end up costing us more time & money than we'd originally planned for, but I'm getting ahead of myself.

The Village People song "In The Navy" now makes a lot more sense
We asked the marina, as per Kirby's recommendation, that they order 5 gallons of the red Micron CSC bottom paint from Interlux for the hulls.  For the keels, as per Kirby's recommendation,  we ordered two pints of Petit Vivid, one pint in red, one in yellow.  His thinking was that we would mix them together to get orange.   As it turns out, if you start adding red paint to yellow, you only need about one quarter as much red to make a very vibrant orange.   Adding any more makes it too dark and you get a kind of blood orange red.   So we managed to get a little less than one coat of paint on the keels before we ran out of paint.   And, because this all happened at the tail end of our death march, on a Sunday, when we were supposed to be put back in the water the following morning, we were stuck and pressed for time.

Pink rudders and keel.
Don't ask, don't tell.
There weren't any stores open on a Sunday that sold any kind of bottom paint, much less in yellow or orange, but we managed to find a friend with an almost entirely unused gallon of white by the same manufacturer.   We were desperate, exhausted, and so bleary from those fucking grinders that we would have used goats blood if they bled yellow, but the white seemed like it might work.   We tried mixing the remaining bit of orange paint into it.  Interestingly, one third a pint of orange paint mixed with three fourths of a gallon of white paint makes a bit less than one gallon of peach colored bottom paint.  Peach.  And it was a retching shade of peach at that.

We still had about three fourths of a pint of red, so figuring "in for a penny, in for a pound", we mixed that in as well.  We now had a gallon of bright pink bottom paint.  Pink.  Not purple, not rose, not even lavender . . . but pink.  Bright pink.  The kind of pink that liltingly asks, "Hi Sailor, new in town?".  Fortunately, the Don't Ask Don't Tell policy has been discontinued, so we might just have improved our chances of getting rescued at sea.   [editor's note:  To all rescue personnel:  if you see us clinging to a bright pink keel, please remember that we are grateful for your assistance, don't care what your orientation is, and that you look fabulous in that uniform!]  
AnnMarie poses next to her stripes.

Choose a bottom paint color that goes
well with your complexion.
On the bright (pink) side, the hull painting went pretty quickly, except for the boot stripes (those dark blue stripes that run between the white hull and the bottom paint), a job we'd given to AnnMarie because it required skill, patience, and a fanatical attention to detail, which seemed right up her alley.  What we didn't count on was that the warm summer evening also meant lots of mosquitoes, and that the shop lights we used to illuminate the hull would attractive the little buggers.  Once they got close, the smell of the blue LPU paint seemed irresistible to them, and they landed by the dozens on her beautiful handiwork, and then stuck like bugs on fly paper.   I think she started to cry at that point.  The next morning she had to sand off the mosquitoes and repaint.  It seems she always ends up with the fuzzy end of the lollipop on these boat projects.

John was about twice as fast with a
paint brush as any mere mortal.
  Even though we had great weather through all of it, and even though John & JD both worked weekends and through the week with us [without their help we'd probably still be in the yard!], it was a close call being ready in time, and we ended up being delayed until Tuesday, thanks in part to the mosquito debacle.   Fortunately, the folks waiting in line to haul out changed their plans and needed to delay a couple of days, so it worked out alright for us, although I don't think the yard was happy that we took as long as we did.  We still had to finish about a dozen other projects, so it gave us another day to throw some additional paint on the boat and finish up a bit more.

Once you get enough paint back on the boat, you are ready to "splash down", as they say.  This isn't nearly as exciting as it seems, unless you've forgotten to close a thru-hull valve.   They will lower you back into the water very slowly, and it is a very good idea to have folks checking every single valve, thru-hull, stopcock, or flange (whether you've repaired them or not) in case there are any leaks.  Don't let anyone rush you during this phase.  If you have a problem, you'll want to find out before you float off the lift.  It is much easier to be quickly pulled back out than to have to plug a leak.

Fortunately for us, we didn't have any (they developed much later on) but it is a wise policy to spend a few hours checking through the boat.  We spent the night at the dock and didn't leave until the next morning, when we were quite certain that we weren't taking on water.   Work done by the yard is usually guaranteed, but DIY repairs aren't, so be absolutely certain that you did the job correctly.

As it turned out, we were unsatisfied with the way the one inch diameter (unflanged) valves were installed (see our blog entry titled
Thru-hull Flange Plate and Marelon Flanged Valve Installation), and we ended up going back to the yard a few months later, hauling out again, and replacing them with a better solution.


Thursday, July 28, 2011

Cutlass Bearing Replacement

Or why I walk with a limp...

You'll never think of your cutlass bearing (or your colon) the same way again.

At some point in your life, you will go to your proctologist and he will say something to you along the lines of "You are old; it's time we looked up your butt".  No doubt he'll downplay the whole thing, but the bottom line (no pun intended) is that you are going to be given "roofies", then anally raped with a camera the size of a donkey.  When you regain consciousness your doctor will try to convince you that everything went fine, then demand that you pay him for something you don't quite remember happening, which on the whole you should probably be thankful for.

The shaft log inside the prop flange, as it
protrudes the bottom of the boat. The
propeller has already been removed.
"What could this possibly have to do with boats?", I hear you ask. Well, gentle reader, if you were a vessel "of a certain age", and you notice a slight vibration at certain engine RPMs, your boat mechanic (which is sort of like a doctor, but when they rape you they don't wear a mask) will tell you that it is now time for a "cutlassoscopy", which is the marine equivalent of a colonoscopy.

That means inspecting and replacing your cutlass bearing (instead of your colon)-- but without the benefit of anesthesia.  In other words, the entire procedure will be performed while you are completely conscious and able to feel pain, and no amount of gin and tonic will ever be enough to get the image of it out of your head.   It almost makes getting polyps seem like fun.

The Cutlass Bearing Sleeve (with a
 new bearing already installed).
For those of you who haven't ever peeked at the dark underbelly of your boat, it may be useful to give a brief explanation of those bits down there.  If you pulled your boat out of the water (which you'll need to do for this particular procedure) you'll see that the bottom of an L45 catamaran has a triangular flange where the propeller exits the hull.  Inside that flange is a long tube called the log shaft and inside that is the propeller shaft.   The log shaft itself is made out of fiberglass and molded in as part of the boat.  The cutlass bearing sleeve, a stainless steel pipe with a thick, stainless steel tear-drop shaped flange welded to it at right angles (see photo on left), is inserted into the shaft at the aft-most end of the log, and bolts to the  hull.  At the opposite end, inside your engine room, the propeller shaft extends out from the log shaft  and attaches to the transmission.   Where the shaft exits the log, there is a mechanical seal (see Propeller Shaft Mechanical Seal Replacement) which allows the propeller shaft to spin freely.  Otherwise your engine compartment would flood with sea water, causing you to wonder why the bow is suddenly pointing heavenly and your insurance agent isn't returning your phone calls.
The Cutlass Bearing.

Inside the stainless steel cutlass bearing sleeve sits the cutlass bearing, which goes around the prop shaft and keeps it from wobbling (which is why they call it a bearing, although it doesn't have any balls or rollers inside it), but it does allow the propeller shaft to rotate without seizing up.

The cutlass bearing is pressed, and sometimes even glued in place, (if, like ours, your bearing sleeve is worn a bit) into the cutlass bearing sleeve.   It looks a bit like a fiberglass toilet paper tube with a rubber lining inside.  The photo on the right is the new bearing before we installed it into the sleeve.  The cutlass bearing has a series of grooves running length-wise along the inside of it, which allow sea water to circulate along the shaft as it spins.  This cools and lubricates both the shaft as well as the mechanical seal at the other end of the shaft log.
The exposed prop nut, the
bearing sleeve has already
been removed.

The "non-metallic" interior of the bearing is a composite material.  There are also metallic (brass) versions of this, but we opted with the newer style, which are supposed to last longer, and have the added advantage of not reacting to electrolysis, which can cause pitting and even mechanical failure in the shaft and sleeve.  The markings on the bearing indicate "192/11", along with "Made in U.S.A" and some obscured printing that we couldn't read, but the size was definitely a 30mm inside diameter, and approximately 45mm  outside diameter, and approximately 120mm long, although our mechanic said that had it been slightly longer, he would have just trimmed it back.
The newly installed propeller,
prop nut & sacrificial zinc.

But before we could replace the sleeve, we needed to remove the propeller and shaft, in that order.   The first step was to remove the propeller nut (which holds on the propeller) and the the propeller itself (which has effectively been "pressed" onto the prop shaft's slight conical shape, is under tension, and needs to be mechanically pulled off), which isn't as easy as it sounds.  You'll want to first remove the existing sacrificial zinc attached at the aft end of the prop nut, using a metric hex key wrench.  Save the zinc if it isn't too badly corroded.

Next, put the engine in reverse and hold the propeller in place while you put an adjustable wrench on the two opposing flats of the prop nut and loosen it.   If you are under twenty, have the arm strength of Popeye, and don't mind holding a propeller blade with one hand while trying to torque the blade with the other, then this approach will most likely loosen the prop nut.   I tried this first, but I did not find it enjoyable when the propeller started to cut into my fingers.   Especially since I was standing on a rickety ladder about six feet off a slippery moss-covered cement ramp, and my swain (after fifteen days of what later came to be known as "The Triton Bottom Paint Debacle") now had a vested interest in things going badly.
The installed cutlass
bearing, in its sleeve.
There is a 19mm retaining
nut holding it in place.

Discretion being the better part of valor, I solved the problem the old-fashioned way.  I asked a yard worker for help.  He placed a 2x4 underneath one of the propeller blades, close to the hub, so that as we turned the nut, the propeller blade spun downward and jammed the 2x4 against the ground, effectively locking the prop in place.  If you use this method, be careful not to damage or bend the propeller blades while you are loosening the prop nut.  If possible, put a clump of rags or hard foam to protect the propeller.  It is also theoretically possibly to lift the boat up further off the ground using this method, but I'm guessing that if you were that strong, you would have used the first approach instead.

Next, we needed to break the propeller free from the shaft.  We couldn't just pull the propeller off because it had been pressed onto the shaft by the gorilla who tightened the prop nut the last time.  To remove it, we needed to use a special tool that looks a bit like a wheel (or bearing) puller.

You can see the slight conical
shape of the shaft where the
prop itself is squeezed onto it.
   NOTE: Do not attempt this without a nut on the shaft!  The propeller is actually under significant load, and breaking it free could cause it to release with an equally significant force.  In other words, not putting a nut on the shaft could mean that the propeller might fly across the yard, landing quite far away.  Given that our boat was still pointing back at the water, this could have caused a bit of embarrassment. 

We decided that being knee-deep in the bay looking for our prop and/or having to explain why it was sticking out of our head wasn't worth the humorous story later on.  Having a retaining nut loosely threaded onto the shaft (i.e. not up tight against the prop, but allowing enough space for the prop to break free) will prevent this from happening.  The good folks at Napa Valley Marina loaned us their  prop puller (ask your boat yard, they should do the same) as this tool is something a lot of folks wouldn't normally carry around with them but is essential when pulling off a prop.  Any decent yard will always have one on hand.


It looks a bit like a giant C-clamp with a fork on one end.  We placed the large forked end around the propeller hub and the other on the prop nut itself.  To remove the propeller, we tightened the prop pulling device's threaded rod, which presses against the prop nut (make sure there is some clearance between the nut and the propeller) which then pulled the propeller's hub towards the end of the prop shaft.  We were a bit concerned about doing this, as we were worried that it might damage the conical end of the prop nut where zinc slides on, so we used a large steel nut that threaded onto the (M20 X 1.5 thread) end of the prop-shaft.  I recommend that you keep one or two of these handy. If you need to pop off a propeller, these will prevent you from damaging the shaft threads or the prop nut.  You may need to exert enormous force on the nut, BTW, and we used a sledge to pound on the prop puller's back end to help free the propeller from the shaft.   When it broke free, we knew it; the prop "popped" back against the nut and the puller fell to the ground.  So did the person holding the prop puller, much to the amusement of the yard employees.
The exposed prop nut,
without the bearing sleeve.

Once the propeller was broken free, we needed to remove the 19mm retaining bolt at the top of the bearing flange.  Be aware that there is also caulking behind the flange, which helps hold the sleeve in place, so we slid a hack-saw blade in between it and the face of the shaft log to break the seal.   Once the seal was broken (enough to spin the flange) we used a large, soft faced (i.e. padded with a rag) set of pliers to rotate the flange in place.  We continued to rotate it back and forth while carefully pried the flange away from the boat.
The Cutlass Bearing Sleeve.  You
can see the small set screw threaded
hole that holds the sleeve in place.

We then removed the flange sleeve completely from the boat's log shaft, and released the hex studs on the side of the flange that help hold the cutlass bearing in place.   We had to scrape off a bit of paint, glue and caulk in order to access this area.   The next step was removing the old cutlass bearing.  The easiest way to do this is by placing the flange on a hydraulic press and using a plug just slightly smaller than 30mm to force the cutlass bearing free from the sleeve.   In some cases it may be necessary to first use a hacksaw from within the sleeve to cut the cutlass bearing lengthwise (being careful not to damage the sleeve itself) to help reduce the compression forces on it, especially if the old bearing had also been glued into the sleeve.  My recommendation is to give it to your boat yard mechanic and plead for help.   We tried pounding it out ourselves, but to no avail and resorted to begging for mercy.
Pitting on the shaft lining.

Once we had the old cutlass bearing removed from the sleeve,  we visually inspected it and discovered pitting at the inside edge nearest the mechanical seal, and what looked like a small amount of wear near the aftmost edge.   We surmise the former was caused by electrolysis, and the later because the old cutlass bearing was wearing.  Much later on we were told by our marine electrician that the pitting was most likely "surface crevice corrosion" caused by inadequate water flow past the shaft.  The claim being that if a boat sits too long without moving, the water surrounding the stainless steel becomes oxygen depleted, which then robs oxygen from the stainless, which leads to this type of corrosion.  It makes sense, given the observable evidence, but whose to say what really caused it?  Another tidbit we learned is that very often electrolysis will occur inside the shaft near the weld joint, if the alloy used in the weld didn't match exactly the shaft/plate alloy.  The propeller shaft itself looked fine in the corresponding areas.  The next time we change out the bearings, we'll check again to see if this became any worse, but for now it seems okay.


There was one problem though; our new cutlass bearings did not fit "snug" inside the sleeve (our mechanic claimed they usually have to press them in place), and he was concerned that we would not be able to tighten the bearing set screw enough to prevent the cutlass bearing from spinning freely within the sleeve, which, in his words "would be bad.  very, very bad.", and then thunder rang out and a wolf howled in the distance.   His advice was to use something like JB Weld 2 part epoxy to cement the sleeve in place.   This is what we ended up doing; we're not sure if this was the best thing to have tried, but we've only had good advice from the folks at Napa Valley, so, if this turns out badly we'll let you know.  Anyway, we smeared some epoxy on the bearing and slid it up into the sleeve and allowed it to harden.  We were also advised to pre-drill a small divot into the cutlass bearing itself such that the set-screw would fit into it, and to not tighten the set-screw so much that it would deform the shape of the cutlass bearing.


We then re-installed the new cutlass bearing in the sleeve, first applying "NEVER-SEEZ" anti-corrosive paste to the exterior shaft of the sleeve that contacted the shaft log (this wasn't absolutely necessary, but we thought it couldn't hurt), and also applied BoatLIFE's "Life-Calk" polysulfide sealant to the inside face of the flange that came in contact with the (aft-most) shaft log facing.  That part was necessary to keep water from leaking in between the shaft log and the bearing sleeve. We also filled the circular trough in the facing with caulk (you can clearly see the trough in one of the earlier photos), and then pressed the flange up against the facing, fairing out the caulk and making sure it created a good seal around the flange.  We then re-installed the set screws that hold the cutlass bearing from turning (also coating them with anti-seize compound).  Once everything was in place and tight, we painted the exposed surfaces with bottom paint and re-installed the propellers, the prop nut, and the zincs.

Of course, we first put the boat in neutral and turned the prop shafts to make sure that everything spun true and freely, before putting it back together.   Going back in the water was a bit nervous making, but nothing leaked and the boat ran fine at all engine speeds, without any vibration.   This seemed to fix the slight vibration we had noticed earlier, and it hasn't returned since.   If I had to do this all over again (which I'm assuming will be the case eventually) I think I'd have ordered (or had made) a new set of stainless steel sleeves (seems like a good thing to have on hand anyway), and perhaps taken that opportunity to add a shaft vibration dampening plate, or even a new prop shaft, but that is probably just wishful thinking on my part.  As it stands now, we're delighted with the result and are looking forward to many more years of faithful, maintenance-free service.

And having also undergone a colonoscopy around the same time (with similar results) I can honestly say that between the two, the medical procedure was faster, less painful, and covered by my insurance.  

Napa Valley Marina


The Boatyard That Time Forgot


A user's guide to the best kept secret boat yard in the S.F. Bay Area.

The view from our boat while at Napa Valley Marina.
We needed to haul out our 25' wide catamaran, somewhere in the San Francisco Bay area, preferably somewhere close to our home port of Emeryville, in the S.F. Bay.   So I started calling around looking for yards that could accommodate us.   Much to our dismay, there were none within our immediate vicinity, and only one, the Napa Valley Marina, within fifty miles!  It sucks that they are the only game in town if you own a big, wide catamaran, but as it turns out, they are a really great marina with an extremely competent staff.  They can also do just about anything you need, and there are long term dry dock options if you need to be "up on the hard" for a while.

Some of the grounds & facility.
What follows is a description of the marina, and our very positive experiences there.  Although the yard got off to a bad start with us, we think that overall they are a great place to go for boat work, especially if you own a catamaran or trimaran, and we would gladly recommend them to anyone looking for a safe, inexpensive boat yard to have work done, and especially for the DIY types-- but we would also caution you to be very, very explicit about schedules, expectations and arrangements, which we'll explain in greater detail a bit further on.  But we really do like this yard, the folks who work there, and the area in general.  If you are looking for a place to haul out, we give them top marks.

The railway lift, Napa Valley Marina
The marina is nestled in the bucolic, rolling hills of Napa, surrounded by wineries and orchards (there are herds of cows grazing just across the road from the marina) and an amazing restaurant within bicycling distance of the yard, with a dozen other great places to eat within a ten minute drive.   It is a very quiet, peaceful area, with animal life everywhere.   There were flocks of geese and ducks wondering around the boat, we saw every type of water fowl imaginable, and all the folks we met there were more than helpful.   The marina was built by two brothers, mostly by hand, and has been a family business ever since.  It has a very large yard with short, medium and long term storage.  Most of the staff have worked there for decades, and they have a great (and well-deserved) reputation for being a very friendly place to keep your boat and/or work on it.

 There is quite a large flock of
geese and ducks milling about
the water's edge.  Don't get too
lackadaisical, a seemingly friendly
 goose may still bite your ass. 
The only exception to this was the marina's salesman, who created a bit of a challenge for us.  And to be clear, he was also very friendly, it was just that everything he told us turned out differently.  We had originally scheduled our haul-out months in advance, over the phone, and were told that there was no need to leave a deposit.  We took that at face value, and had sent out requests to numerous friends asking for their help.  We knew that, in addition to replacing the thru-hulls, we also wanted to repaint the bottom, and that was going to be a lot of work, and we expected to be out of the water for at least a week or two.  We had over thirty folks volunteer to show up to help.

Mike riding the rail car down in preparation for hauling.
We hauled out early Friday morning after all.
With less than a week to go, we found out that Kirby, the sales rep there, had forgotten to put us on the schedule, and that we'd have to haul out "some other time".   We were really thrown for a loop, and if there had been any other marina to use we'd have gone elsewhere then and there.  The problem was that elsewhere was San Diego, and the sail there and back wasn't that appealing.   They say that politics is the art of saying "nice doggy" while you look for a big stick.  With that in mind, we reluctantly rescheduled, and then spent two hours calling everywhere and everyone we knew to see if maybe we'd overlooked someplace else that could haul us out.  No such luck, we were going to haul-out in Napa in July, but in retrospect, we're glad it worked out that way.
Triton up on blocks.  You can see the heavy duty railway
winch used to pull us out of the water in the foreground.

We then had to ask our friends' indulgence and cooperation in setting up the new date.  We even arranged for a Friday morning haul-out so that we could get started early and have everything set up and ready for when our hoard of friends showed up for the weekend.  As it worked out, we had a half dozen friends who volunteered to ride up with us and be there all day Friday to help us set up!  Things were looking good . . . did I mention Kirby?

When we rescheduled, we made very certain they wouldn't forget us a second time;  we called or emailed them every week or so leading up to the haul-out just to check in and remind them we were still coming.  Then, with only days to go, we were told by our favorite salesman that there had been a slight mix-up, and that they wouldn't be able to haul us on Friday morning, but it was "no big deal", we would just have to wait until Monday.   "You have got to be fucking kidding!",  I think was my initial reply, followed by "Was it something I said or do you just not want our business?!?".  They assured us that this was just an unfortunate series of events.  Apparently the only two guys who could supervise the haul-out, Mike (the yard manager), and Tom (one of the owners) had scheduled their vacations on that same Friday without telling each other, and there wouldn't be anyone there to haul us out.

We then made it very clear to Kirby that we had over thirty folks showing up this weekend, and no, we weren't going to cancel on them a second time, and yes, this was a big deal, and if need be, we would sail to San Diego.   There followed some very tense talks with Mike, the yard manager, who turned out to be a great guy to work with, very professional and who tried his best to resolve the situation.  I definitely wasn't in a good mood before I first spoke to him, but after we got off the phone I felt like we still had a chance of pulling this off.

He assured us they would work everything out.  Later on Kirby called back to say that they would haul us on Friday after all (both Mike & Tom had postponed their vacation plans for a day and agreed to come in) but that they wouldn't be able to do it until that evening.   That pissed us off, because it meant we had to turn away the folks who had offered to help us on Friday, and we'd pretty much waste the entire day just sitting at the dock waiting for the late afternoon high tide, but at this point we would take what we could get.
Make sure you time your transits during bridge hours.
We sailed up to Napa leaving Emeryville Thursday around nine in the morning, arriving at the marina around 3PM.  We had a pleasant trip, but the ride up the Napa river can be a bit tricky.  For one thing, the bridge only operates between the hours of 9AM and 7PM, so you need to take care that you time your trip appropriately.   You will also be at the mercy of the bridge operator, who delights in raising the causeway about three feet higher than your mast (which he can clearly see from his perch on the bridge, and you cannot) and then berating you for taking so long to get going.   No doubt this is an endless source of amusement for him, but it made us a bit nervous the first time it happened.  We've since come to appreciate the thrill of finding out just exactly how good our insurance really is.  One other word of advice, the currents around the bridge can move quite fast.  Make sure you have good head of speed and complete control of your vessel when going through, especially if you are running with the current.

None the less, we'd arrived safe and sound, and tied up along the utility dock and wandered in to the office.   We were now a bit gun-shy about anything Kirby promised, so we immediately checked in to see if things were still on track.  That attitude turned out to be a bit more justified than we wished.   Our friend Mike had just recently hauled, scraped and repainted his boat there had warned us that it was critical to reserve enough of their special paint grinders, which we'd made a big point of several times, both verbally and in email.   Mike had been burned because there were a limited number of them and you couldn't use your own.  Kirby had assured us that it would be no problem renting three, but when we got there, he told us that they only had one available for the entire weekend.


R2D2's ugly cousin.
We were pissed.  We had thirty people coming, but we wouldn't have any equipment for them to do the work with.  Great. Just great. At that point we were so upset that we started talking about just turning around and going home.  Surprisingly, it then turned out that there actually were other grinders available for us to rent, in fact for much of the time we had the use of four.

But to put salt in the wound we discovered (and only by a chance conversation) that they also intended on hauling us Friday morning, not in the afternoon, as Kirby has told us!!  No one had let us know that they'd changed there mind, so we'd told our friends not to show up without reason.   We were not amused.

The power distribution panel, bring your own
extension cords
From our perspective, it seemed like anything we tried to do to save time or money, Kirby found a way to hamper.   We saw that pattern repeated several times with other customers as well, but that was the only gripe we had with the marina.  Otherwise, the employees were friendly, helpful, and extremely professional, we could easily get whatever parts or supplies we needed, and we got great help and advice from Mike (the yard manager), Steve (who gave us great tips about how best to paint the hull stripes), Jeff (whom they called "the new guy" because he's only been there twenty years and told us a very useful tip about protecting the topsides, which we foolishly ignored), Kelly (who did most of our fiberglass work on our boat, was incredibly patient and knowledgeable and also an impressive artist in his own right), Cory (who worked in the marina store and would always either know the right answer or admit that she didn't) and even Kirby, who despite an unfortunate series of events, was always warm, cheerful and tried his best to help.
If you're gonna have a vice, at
least enjoy it.


[editor's note: the phrase "an unfortunate series of events" is how we came to describe any failed attempt by any customer to save time or money because of misinformation provided by Kirby.  We do not believe this was intentional, but...]


Our advice is to double check every stated claim or assumption with at least two other employees (preferably those actually responsible for providing the service or equipment) and get everything in writing.  Ultimately, we found that in this one regard, being extremely paranoid paid off.  Otherwise, we loved the place, and have since gone back to have other work done, and intend on going back again.   If you have a big cat, or trimaran, this is the place to haul in the bay area.


The marina itself is located pretty far up the Napa river.  Most of the river's waterway is quite deep, but there are a few short sections past the bridges (you go under three of them on the way up there) where the depth is less than six feet in spots and you'll need to pay close attention.   Keep your eyes on your depth gauge and study the charts carefully.  It is easy to hit the bottom and we met a few folks who had; the river has sunken boats all along it, and the bottom isn't necessary well marked or exactly what is shown on the charts!

But you are now in the land of multi-hulls.  Because they can easily haul large and unwieldy boats, you'll find a lot of them up there.   In fact, we joked that it is where trimarans go to die.  We saw hundreds of them in the yard, some that had obviously been there for years, and were rotting away.  I'm not sure why folks continue to pay rent on a boat that  is the moral equivalent of a rusted out '79 Pinto on blocks, but people do.  We also saw a lot of really cool boats in various stages of repair.  This is clearly a DIY yard where you can save a lot of money doing most of the work yourself, and rely on an expert staff when you need to.  [editor's note: DIY is pronounced "die", which is often what you will want to do after you've spent three otherwise beautiful, sunny weekends hanging upside down in your bilge breathing toxic dust, instead of just chartering someone else's boat.  But I'm not bitter.]
Kelly & Jeff lower the rail car down into the water.

To haul large catamarans the marina uses a rail car with a metal I-beam structure welded on top, which they lower down into the water and float the boat over, then pull the rail car (and the boat) up out of the water by means of a massive winch and cable system. That means the boat is dangling ten feet up in the air when you are working on it, but it also means both hulls are completely exposed and it was easy for us to get at anything on the hull that needed work.   The yard has adequate power and water available.  We would caution you that the water comes from a local well, and although we showered and washed with it, we didn't drink it.  We recommend topping off your water tanks before you go there.
AnnMarie displays the Owl Of Yurin


There are men's and women's (hot!) showers & bathrooms, but you'll need a key, which requires a $25.00USD deposit per key, and you'll need at least two keys.   One of which you will loan to one of your well-intentioned friends, who will immediately forget where they put it, then you'll waste approximately four hours looking for it.  The other key you'll use to keep from dying of peritonitis caused by a burst bladder that occurred while looking for the first key.


To prevent this "moment" from ever happening again, we created "The Owl Of Yurin", a very large plastic owl, to which we attached the "loaner" key.  Believe it or not, we still managed to lose the owl, but just not as often, and it usually didn't take as long to find it when we did.  Not surprisingly, when you really, really need to pee, it is no fun looking for a large plastic bird.  BTW, the other key we attached to the recently removed propeller, which made losing it only slightly harder. 


We can not stress how useful it was to have a relatively
clean place to sit and relax in the shade.
The other thing we did, that turned out to be a good idea (for us at least, I don't think the marina was as happy about it) was setting up a shaded rest area along side the boat.  Normally, I don't think we could have gotten away with this, as they usually have all six rail lines in operation.  As it turned out, the car next to us was in need of repair that week, so we used it's frame and a couple of their cradles to help create an awning, and placed our cooler and chairs under it.   If you are doing any boat project that is going to last more than a day or two, we strongly recommend you set up a protected area somewhere you can sit comfortably out of the sun and relax with a beer.   This is probably why so many of our friends came back to help a second time.


Each night we covered everything
in plastic tarp to keep the dew out.
The other thing to be aware of is that during the late summer you will be fogged in every morning, usually until about 10AM, and everything will be covered in dew and soggy.  We always wrapped everything in plastic tarps when we quit for the evening.   We also created a separate workbench underneath the bow of the boat, where we kept all our tools and supplies.   If I had to do this all over again, I'd recommend creating a completely enclosed space out of tarps right there, so that you always had a clean, dry, shady spot and could keep everything organized.    On any big project like this if you aren't extremely organized you are going to spend a significant amount of time wandering around looking for things.   Having a well organized area really made a difference.  Also, spending the time each evening to put everything back in place and clean up turned out to be especially important.  We can't stress that enough.

Why I had to take 2nd grade over again.        


In fact, everything I know about boat work I learned in kindergarten:

  1. Put away your toys (or tools) when you are done with them.
  2. Listen to what the teacher (or yard workers) tell you.
  3. Don't yell or bite anyone's head off, just because you're tired or hungry or didn't get your way.
  4. Take frequent naps, and drink lots of water.
  5. If you need to go to the bathroom, tell someone.  Also let them know where you left the key.
  6. Don't leave the lid off of the Elmer's glue, paint, or caulk.
  7. Don't run with scissors, or grinders, or Exacto blades.
  8. If you break something, don't blame it on AnnMarie.
  9. If you make a mess, clean up after yourself. Don't make AnnMarie do it.
  10. Don't pull down the girls pants.  Especially not AnnMarie's.  Especially if she is standing on scaffolding and holding a paint brush.

They actually didn't cover that last bit in kindergarten, I think it was at least fifth or sixth grade before anyone mentioned anything about it.


The other thing we're glad we did was set up a way to haul things up to the boat from the pavement.   To that end we strung a milk crate on a line through a pulley.  When you are that high up in the air, climbing a dew soaked ladder while holding something is a very dangerous act.  Especially when you are exhausted from boat work, and suicide seems like a good alternative to finishing the project.  
[editor's note: It shocked both of us to admit that, about 1 week into the project, the thought of serious injury did not seem as bad a fate as having to finish grinding the bottom paint off the hull.  If you are harboring these kinds of thoughts, it's best not to be standing twenty feet off the ground on a wet ladder while holding a can of acetone.]

It is far better to just throw things in the crate, climb up the ladder, then pull up your treasures.  It may also be the closest you ever come to recreating your childhood tree fort.


Also, place a pad between your ladder and the boat, and then tie the ladder securely to something solid on your boat.  The marina was kind enough to give us a great "orchard" ladder, but I wouldn't want to have relied solely on it to stay in place.   Knowing that the boat had to fall down before AnnMarie could collect on the insurance made climbing up and down far less nerve-racking.   And you will climb up and down a lot, BTW.  I think we both lost about 15lbs while we were up on the hard, and a lot of that I attribute to that fucking ladder.   By the end of the project I'd have paid double for a boat yard with an escalator.

The one big mistake we made was not following the great advice we got from Jeff (the new guy), who suggested we cover all the boat's horizontal surface with plastic, and/or wash down the boat every evening.   If you are doing any serious scraping, sanding, or grinding (or if any boat within 100 yards of you is) you'll want to protect your topsides from dust accumulating on it.  It took us about a week's worth of extra effort to wash off this grime, and we ultimately had to resort to a mixture of "On & Off" and bleach, which makes a scary strong cleaner, and is probably outlawed by the Geneva Convention's Ban on Chemical Warfare.   If you have to use this stuff, it is worth investing in one of those chemical suits your see on crime shows.

[editor's note:  My critics tell me that I need to finish with an upbeat ending, because almost everything I write usually terminates with me being dirty, smelly, exhausted, an emotionally broken man, financially destitute and miserable.  I will do my best to try to complete this entry on a positive note.]  

There is a restaurant just down the road from the marina, called The Boon Fly Cafe.   If you are stopping at Napa Valley Marina for any reason, you should go there - even if you think you aren't hungry.  They have amazingly good food, wonderful service and are one of the main reasons we survived the haul-out.   This is a top notch restaurant and we strongly recommend your try their "Green Eggs and Ham" breakfast.  It will give you new reason to live.  Trust me.  You won't be disappointed, especially if you are covered in paint dust, wearing the same clothes you had on yesterday, haven't showered in three days, aren't sure if you've got enough space left on your credit card to afford breakfast, and grumpy, which was how I began every morning.  It went downhill from there.

Cheers!